Took me longer than I would have liked, but my new site is up. I will no longer be updating this blog, so to keep tabs on what I’m up to, head on over to my new site!
Under Construction
I am indeed still alive. Now that I no longer have the job that was sucking the creativity out of me, it is time to get back to doing what I love to do. So for the next few weeks, I’m going to do some site redesigning, possibly a name change and other exciting stuff.
Piggy Biscuits

My youngest brother recently bought three pigs, and the other day he was telling me that he wished that he had treats to give them when he goes in the pen. It is much easier to handle them if they want to come to you, and a happy pig is a good thing.
So yesterday I made him some cookie type biscuits for his pigs. He had been joking when he suggested that I make him some, so he was pretty surprised that I actually did. Am I a good sister or what?
These treats are also great for dogs. I know Raider didn’t mind being a guinea pig. I chose this recipe because we had some bananas that were just weird. They never really ripened and were not edible at all. But since pigs don’t really care if their bananas are ripe or not, it was a perfect way to not waste them. I was going to make them into fun shapes, but then I just went with a 2″ cookie cutter.
Peanut Butter and Banana Piggy Biscuits (adapted from allrecipes.com)
Ingredients:- 3 eggs
- 1 c peanut butter
- 1 ½ c mashed banana
- 3 tbsp honey
- 3 c whole wheat flour
If your dog is allergic to wheat, I’m pretty sure other types of flour could be used.

Mexico Quilt
We have a fundraiser for the Mexico trip coming up and I was thinking of making a small quilted wall hanging for the auction we will doing. The women in Chiapas make amazing fabrics and I thought it would be fun to try to capture the color and patterns of their work.

Photo found at Americazoom

Photo found at art for housewives.
In addition to weaving, they also do machine and hand embroidery that is just as amazing.

Hand embroidered eyeglass cases found at Mexico Cooks
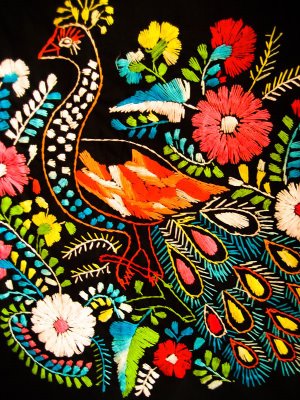
Embroidered tunic found at takaramo
I found a random square pattern generator on the internet that is a lot of fun to play with. It allows you to save patterns you like, and it randomly made one that looked like flowers. Flowers are a common element in their embroidery, and I felt it also captured the feeling of their weaving.

I don’t know if I will do quite that many blocks since I only have a month to work on it, and I don’t want to make it too complicated. We have a lot of scraps of fabric around, so I think I will just use those and make each flower a bit different.
The Butterfly Circus
So rather than a whole ten things, I’m going to do just one. I stumbled on a short film called The Butterfly Circus. It is one of the most amazing and inspiring short films that I have ever seen.
Here is the synopsis from their website– “The Butterfly Circus is a touching tale of a circus that travels across America during the Great Depression. It stars Nick Vujicic as Will—dubbed “the Limbless Man” by the cruel showman at a fairground sideshow, it is only when he joins the Butterfly Circus that he realizes his true potential.”
Apparently it is going to be made into a feature length film, which I would definitely go see in theaters (something I rarely do nowadays.) It is 20 minutes long, but is really worth watching, so I hope you do.
Macarons
I think I have mostly recovered from my sugar induced coma to write this post. I don’t think I’m going to need to eat macarons for a long, long time. I now more fully appreciate my mom’s dislike of strawberries, way too much of a good thing in one sitting can ruin it for life.
But on to the real reason you are reading this, the macarons. Ours didn’t turn out perfectly, they didn’t have a foot and they had some air bubbles (in the case of the chocolate). Who cares as long as they taste good?

Macaronage
Yesterday K and I tried our hand at macarons. I am still recovering from my sugar over dose, and as such really don’t want write about it today. (Soo many macarons…) I’ll just give you a sneak peak of tomorrow’s post.

The best chocolate chip cookie recipe ever?

I wanted to try making macrons yesterday, but Derek wanted chocolate chip cookies. Since chocolate chips are faster, they won. I’m kinda bored with just the regular Toll House chocolate chip cookie, so I started searching the ‘net for a new recipe. First I checked all of my favorite food blogs, but I didn’t find anything different.
A quick Google search brought me to Savory Sweet Life’s chocolate chip cookies. Since they claimed to be the best ever, I decided to give them a try. I thought it was interesting that it called for sea salt specifically.
I think the sea salt is the secret to these cookies, it gives them a salt caramel kind of flavor. They were much flatter than I usually prefer in a chocolate chip cookie. Maybe I did something wrong, but mine were wafer thin (I think I didn’t have enough chips). They are very delicious however. And quite addictive. Maybe it is the fact that they are so thin that contributes to the fact that you can eat bunch of them before you realize it. (Or again, maybe it is just me.) They are thin, chewy with crunchy edges, and have a butter salty caramel deliciousness going on. Best chocolate chip cookie ever? Perhaps, but they certainly are different from your standard Toll House.
(EDIT: So I mis-read, and put in too much butter, which is why mine are so thin. I’ll just have to make them again. 🙂 )

The Best Chocolate Chip Cookie Recipe EVER!
Recipe Type: Dessert
Adapted from: Savory Sweet Life
Prep time: 10 mins
Cook time: 12 mins
Total time: 22 mins
Serves: 48 Cookies
Ingredients
- 1 cup (2 sticks) salted butter, softened
- 1/2 cup sugar
- 1 1/2 cup packed brown sugar
- 2 eggs
- 2 tsp. vanilla extract
- 2 3/4 cups (12 oz) all-purpose flour *If at all possible, please weigh the flour
- 3/4 tsp. smallish-medium coarse sea salt
- 1 tsp. baking soda
- 1 1/2 tsp. baking powder
- 1 cup semi-sweet chocolate chips
- 1 cup white chocolate chips
- 1/4 chopped walnuts
Instructions
- Preheat oven to 360 degrees. Cream butter, sugar, and brown sugar until it is nice and fluffy (approx. 3 minutes on medium-high speed on a K-5). Add both eggs and vanilla and beat for an additional 2 minutes. Add baking soda, baking powder, salt, and flour until cookie batter is fully incorporated. Finally add both chips and nuts until well distributed. The cookie batter should be somewhat thick. Drop about 2 tablespoons of dough or use a medium cookie scoop and plop the batter onto a baking sheet lined with parchment paper. Bake for 12-14 minutes until the edges are nice and golden brown. Remove from heat and allow the cookies to stay on the cookie sheet for an additional 2 minutes. Pick up the parchment paper with the cookies still on top and transfer to a cool non-porous surface. Allow the cookies to cool on the paper for at least 3 minutes before serving. Enjoy!
Notes
*please do not use table salt, the sea salt gives the cookies a nice flavor and hints of texture. If you only have table salt, use 1/2 tsp. *When using sea salt, you will get small crunchy flecks of salt when you bite into the cookie. If you do not like this taste, go with 1/2 teaspoon of table salt.
*I realized grocery stores sell bags of chocolate chips in 12 oz bags but this recipe really needs every last chip. Otherwise you’ll get cookies with only a few chips in each one and this recipe requires lots of chocolate to bulk the cookie up. You’ll need about 1 1/2 bags. (The original recipe called for 2 1/4 cups of chocolate chips. It really does need all of those chips, mine were so flat with out it. But I would still add 1/4 walnuts to the 2 1/4 cups of chips, because I like walnuts.)
10 Things I Love


1. Daisy Jane’s Geo Grand collection, I love the quilt Jaybird made with it too.

Photo from The Inadvertent Farmer
2. Using chalkboard paint to label jars.

Photo by Danny Santos II

Photo by Danny Santos II
3. Danny Santos II‘s project shooting strangers on orchard road. I love how he manages to find the beauty in all of the random people he finds.

Photo by Dave Mead

Friendly mutton chop by Dave Mead
4. This is an impressive set of beards I found at ShareSomeCandy by Dave Mead.

Photo from Cluck Cluck Sew
5. Cluck Cluck Sew’s scrap buster pillow tutorial. Mom has a lot of cool scraps lying around that would be perfect for this.
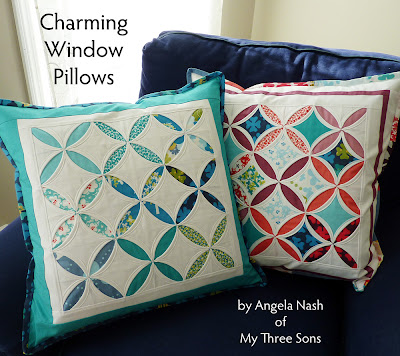
6. And another pillow tutorial, this time at Moda Bake Shop. My grandma made a huge cathedral window quilt that I love and I have always wanted to try making windows.
7. Camp Out by An Horse. I think these guys are one of my new favorites.
Photo by Katie Boyette of caffaknitted
8. Nesting Monsters by caffaknitted. I believe these were made with plastic Easter eggs.

Photo from A Cozy Kitchen
9. Avocado fries sound delicious.

By Micheal Shapcott
10. Paintings by Micheal Shapcott {via Look in art}.
Fat Cats Part 4
When I went to Micheal’s last, I bought black and pearl grey Rit Dye for the border fabric. We finally got to dyeing yesterday. K has an excellent laundry room for such things, so we did it at her house. That and I hadn’t been over in a while.

I love her 'smart' washer and dryer.
These were our ‘tools’, at first we were thinking about dyeing it in the bucket, but the fabric wouldn’t be about to move about freely. We decided to use her sink instead, which we had also used to tea dye fabrics in the past. It is just a good sink for that sort of thing.
We cut two strips of the fabric, one for the before, and the other to test and see if we liked the color before taking the plunge and dyeing the whole fabric.
The test strip turned out well, so it was on to the whole fabric. We actually measured the correct amount of dye and water, (and pre-wetted the fabric, which is important), because the whole packet dyes 3 yards of fabric and I had 1 3/4 yards.

After a lot of stirring, we ended up with this.

It seemed too light, so we decided to add some black dye. I didn’t really measure the ‘correct’ amount this time, I just threw in a teaspoon of dye.

Jon was 'helping' the whole time.

And Bongo, the evil one herself, was supervising.
I’m quite pleased with the results. It just needed to be a bit darker. Oddly enough, Rit black is a purple black, so the end color is a pearly, purpley black.


After and Before
After a quick trip through the dryer, the fabric was ready to cut. K and I decided that three inches was a good border width, so I cut out four 3 1/2″ strips.

I put the side borders on first, and then the top and bottom. The next step is to figure out how it is going to be quilted. For the binding, I’m going to sew the background fabrics together.
 I think I’m going to Petco to find the bells for the collars. I’m pretty sure they sell them separately, and in many colors. It feels good to have this project almost done after having it sit on the shelf for so many years.
(Sorry this is going up so late, it looks like I didn’t hit the schedule post button and thus it didn’t get posted.)
